Week 3 Lab: Git and GitLab
Git Repository: https://gitlab.msu.edu/mi-250/git-and-gitlab
In this week’s readings, you read about version control and Git. A Git repository is a specific, named collection of files that usually make up a single program. You’ve already used git repositories in this class - all of the files for last week’s lab were stored in a git repository, which you accessed through the Gitlab website.
Today, the first thing you are going to do is to get your OWN copy of the repository for this week’s lab on your computer - not by downloading it, like last week, but by having Git make a copy of it on your computer.
Part 1 - Setting Up Git
Make a copy of the repository for your pair (only do this once!)
At the top of this page, there is a link to this week’s GitLab project. Click on that link and open it in a new window. What opens is a web interface to a repository for the base version of this lab. You will have to log into GitLab with your NetID and password in order to be able to see the project and repository.
GitLab is a system hosted by MSU that hosts repositories and allows you to create new ones. Each project in GitLab is a Git repository. GitLab allows you to share them with other people as much as you want, for free.
Fork the project
The first thing you will do is to fork the project. Forking a project means making a new project that is a copy of an existing project.
IMPORTANT: only one person in your pair should do this step each week. Usually this will be whoever’s driving first. You only need one copy of the project between the two of you.
To do this, look for the “fork” button on the top right of the project page and click it. It will ask you for a ‘namespace’: there should be only one option, with your name. Click on that to start the forking process. Forking will take a moment. Once it finishes, then it will take you to the new project. The new project should look almost the same as the original – it is a copy, after all! The main difference is if you look at the top, instead of saying “MI-250 / Git and Gitlab”, it should say your username now. If it does, then great! It worked! If not, then ask Caitlin or Shiyu for some assistance.
(Note: sometimes you may get a 404 Error page. That happens when forking is slow. Just wait a minute and hit “refresh” and it usually fixes itself.)
Give other people access to the new project
The first thing you should do after forking a project is to give your partner, Caitlin, and Shiyu access to the project. In the menu on the left, find “Manage” and then go to “Members”. This is the page where you can give other people access. Click on the blue “Invite Members” button on the top right. A window will pop up. Search for your partner in the “username or email address” box – the easiest way is to search for their MSU NetID. Also search for and add Caitlin (geierac) and Shiyu (xiangsh2). Then change the “role permission” to “Maintainer” – the highest level of permissions. You don’t need to add an expiration date. When you’re done, click the “Invite” button at the bottom of the window. The three people you added (your partner, Caitlin, and Shiyu) should show up in the member list.
Make sure your partner can access your forked project
Next, the navigator (who was just added to the project) should try to log into Gitlab https://gitlab.msu.edu and click on “Projects” -> “Your Projects”. They should see the “Git and Gitlab” project on the list, and be able to click on it and view the files inside of it.
Congrats! You’ve now got your first GitLab project! Good work!
Set up your computer to use the new git repository
NOTE: remember to practice pair programming for this section! Get everything working on one person’s computer first before you start trying things on the second person’s computer. This will make things A LOT easier in the long run, I promise!
You’ve now got your own project, but right now it only exists on GitLab. That’s great – it is on a webpage where others can see it also. But you need to be able to edit and run the programs on your own computer.
To work with the files in the repository on your own computer, you could download the files like we did last week. But it’s hard to share files with your partner that way (as you may have discovered last week). Instead, we’ll be using Git.
What Git allows you to do that simply downloading the files doesn’t is to make a two way street between the files on your computer and the files in the repository on GitLab. Git allows you to make changes to the versions of the files on your own computer and then to easily push those changes back up to GitLab so that other people (like your partner) can access them. Git is a tool that is built to allow programmers to easily share code with one another.
Install Git
The first thing you’ll need to do is download and install Git onto your computer. You can download the Git installer from the Git Downloads Page.
On Windows:
On Windows, choose the standalone installer. If you have Windows 10 or Windows 11, the 64-bit installer will work fine. The installer will ask you a lot of questions. Just click next on all of them.
On Mac:
If you are on a Mac, the best way to get the most up to date version of Git is to install Homebrew first, and then use Homebrew to install Git. The easiest way to do this is to use the package installer. Scroll down to the bottom of the page and click on the “Homebrew-4.3.19.pkg” link to download the installer.
Once Homebrew is installed, you can install Git by running this command in Terminal:
brew install git
If you couldn’t get the package installer to work, try the alternate options in the Troubleshooting section at the bottom of the lab.
Make sure Git is installed properly
Once you’ve got Git installed, open up a command line window (Powershell on Windows or Terminal on Mac). If you just type the command git, it should print out a bunch of help information about the different git commands. If it does that, then you’ve got git installed correctly! If you get an error message or a bunch of red text, then you haven’t installed Git correctly yet. Go back and try again.
Tell Git who you are
The first thing you need to do to set up Git is to tell it who your are. Use the following two commands to tell it who you are, substituting your name and email address for mine:
git config --global user.name "Caitlin Geier"
git config --global user.email "[email protected]"
Be sure to keep the quotation marks. You should only need to do this step once on your computer. After that, it will remember who you are.
Create a GitLab Access Token
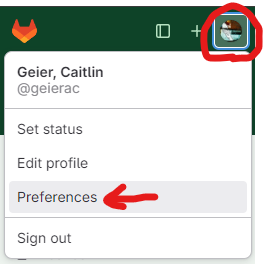
To get files from Gitlab using Git, you need to use something called an “Access Token”. This is kind of like a passkey that you give to GitLab to let it know that it’s you. To create an access token, go back to the GitLab webpage and hover over the sidebar icon on the upper left to make the sidebar visible. In the green part of the sidebar, there will be a circular profile icon on the upper right. If you click on that icon, it should bring up a user menu with your name at the top – choose “Preferences” in that menu.
Once you’re on the Preferences page, open up the sidebar menu on the left again and look for “Access Tokens” in the menu.
On the Access Tokens page, create a new Personal Access Token. Steps:
- Click the “Add new token” button near the top left of the page.
- Type in your MSU NetID in the “Token Name” field.
- Choose an expiration date that is after the class ends - like May 5, 2025.
- Important: click the “write_repository” checkbox. If you don’t, your token won’t let you access the files inside your repositories.
- Click the “Create personal access token” button. The webpage will reload, and near the top, it will show a “personal access token” which is basically a randomly generated password for you to use.
- Save this access token!! You will need to use it shortly. I recommend copy and pasting it into your notes or into a Google doc - somewhere where you can find it later.
You should hopefully only need to use your access token today; after completing this lab, Git should remember it and never ask you again.
Clone the repository
Cloning a repository is always done in three steps:
- Fork the repository (one person in each pair will do this for every lab) or create a new repository (for studios).
- In command line, use
cdto navigate to the place on your computer where you want the repository to live. - Use the
git clonecommand to clone your repository onto your computer.
Step 1: Forking the repository
You already did this step above! Make sure you’re on the page for your forked repository on Gitlab. One way to tell if you’re in the right place is to make sure your name shows up in the breadcrumb links above the name of the repository. If it says MI 250 instead, you’re not in the right place.
Step 2: Navigate to the right place in command line
On your computer, you should make a place to keep your work for this class – a folder to store all of the labs and studios that you work on. I created a folder on my desktop called “MI250” and keep everything in there. But it’s your computer, and you can put it wherever you want (so long as you remember where it is!).
To get a repository on your computer, you need to “clone” the repository – which means using Git to make a copy of the repository that will live on your computer and will talk to the copy that’s on Gitlab.
Open up your command line program (Terminal on Mac or PowerShell on Windows). Then change directories to the directory where you want to keep your files using the cd command. Check out the command line reference if you need help remembering how to do this.
Step 3: Git clone
If you look at the project page for your forked repository, on the right hand side there is a blue button labled “Code”. If you click on that, you get several options. In this class, we will always use “Clone with HTTPS”. Click the “Copy URL” button that looks like a clipboard icon next to the HTTPS option: it will copy a link to the repository onto your clipboard.
Next, we will use a Git command in command line to clone the project. By default, this command will clone the project into whatever directory you are currently in on the command line. That’s why it was important that we cd into our folder for this class before running this command (see Step 2 above!).
The command to use Git to clone a project onto your computer is git clone to clone the project. In command line, type in git clone and then paste in the HTTPS link that you copied from the Gitlab website. It should look something like this:
git clone https://gitlab.msu.edu/geierac/git-and-gitlab.git
Important: Make sure your username is in the URL that you paste in! If it’s not (if it says mi250 instead), that means you’re in the wrong repository.
When you run the git clone command, it will ask you for your username and password. Don’t enter your real password! Instead, log in with your NetID as the username (don’t include @msu.edu) and then use your newly created “personal access token” as the password. If this works, then it should print out information telling you it is “receiving objects”, which means it is downloading the files for the repository for you.
Once the repository has downloaded, you will get a prompt on the command line again. If you use the command ls, you should see a new directory called “git-and-gitlab”. Change directories into that using the command cd git-and-gitlab. If you do an ls again, you’ll see that all of the files from the repository have now been downloaded onto your computer and are there for you to work with. If you look at the folder in Explorer/Finder, then you should also see the files.
IMPORTANT: The new folder that appeared on your computer represents the repository. Anything inside that folder will talk to the repository on Gitlab. If you change the name of the folder or move files outside of it before you work on them, the link between the folder on your computer and the Gitlab repository will be broken.
Make a change to a file on your computer and “push” it to Gitlab
Next, let’s make a change. Open up the file README.md in your text editor. Right now, it has my name (Caitlin Geier) in there as the author. That’s no longer accurate, though – this is YOUR repository now! Change the name to your name.
Add, Commit and Push the change
You’ve made a change to README.md on your local computer. But if you go look at the file in the repository on GitLab, it still has my name in it. That is because you haven’t committed or pushed your change; that is, the change only exists on your computer.
The idea behind Git is you can make all sorts of changes on your own computer that may or may not work. Since they’re only on your computer, you won’t break the code for everyone else who uses the repository. Once you get things working, then you can save those changes to the official repository (which lives on Gitlab) so that other people can access the new, working code.
There are three steps to getting your code from your computer up to the repository that’s shared with other people: add, commit, and push. We’ll go through each of these one by one.
Add
Start by running the status command on the command line:
git status
This command will show you the current status of the version of your git repository that is on your computer. It will let you know if any files have been modified since the last version you got, and if any files have been added or deleted. You should see that you’ve modified the README.md file.
It’s good practice to run git status regularly when using Git. It’s especially helpful for troubleshooting issues.
The first step is to let Git know what changes go together. Sometimes you make changes in multiple different files and you want all of those changes to logically go together as one commit. To do this, git has what it calls a “staging area” – a place you put changes until you’ve got the whole set of them together. You use the command git add to add things to this staging area. You can run this command multiple times if you want to add changes from more than one file to the same commit.
We only have one file with changes – README.md – so we only need to add one file to the staging area. Let’s do so with the git add command:
git add README.md
If your git add command works correctly, then it won’t print anything out. It will just give you a new prompt. If it doesn’t work, then you’ll get an error message.
Tip: If you’ve made changes to multiple files and you want them all to be added to the staging area, you can use what’s called a modifier. The modifier -A stands for “all”. You can use it like this: git add -A. This will add all of the files that you’ve made changes to to the staging area at once.
Note: On many systems, the filename is case sensitive; so if you get an error message, try to make sure the case is correct.
Commit
Once you’ve got all the changes together in the staging area, the next step is to “commit” those changes. Committing the changes takes all those changes and creates a new version of your program that has those changes. That is, it formally records a new version of your program.
To do this, we use the command git commit.
git commit -m "adding my name to README"
Whenever you make a commit, you need to add a message explaining, very briefly, what changes you’ve made and why. -m is a modifier that stands for “message” and you add your message in quotes after it. The purpose of the message is so that you and the other programmers on the project can all tell what’s been changed and why.
Push
Committing the changes only records the changes in the clone of the repository that is on your computer; those changes haven’t gotten to Gitlab yet. That’s what git push does – it takes any changes that are on your current computer that you’ve committed, and it pushes them up to the main repository on Gitlab. Run that command now:
git push
Now go check the version of your repository that’s on Gitlab. Don’t forget to refresh the page. When you look at the README.md file, it should have your name in it now instead of my name. That means that you have successfully commited your first change to a Git repository! Good work!
Swap and Repeat
The biggest benefit of Git is collaboration – it makes it easier to work on the same code with other people. The next step of today’s lab is to learn how that works by swapping roles. The current driver (the person at the keyboard) will become the navigator, and the navigator will become the driver.
Go through all of the same steps, starting with “Set up your computer to use the new git repository” on the new driver’s computer. When you edit the README file, add your name to the file, so that it says “By: Partner’s Name and Your Name”. Be sure to add, commit, and push the changes, and then check on the GitLab to make sure that the changes you made appear there.
Once you’ve done this correctly, then there should be a single Git repository in Gitlab for you and your partner and both members of the pair should have a clone of that Git repository on their personal computer. Either person can work on the program, and then commit and push changes back to the repository at any time. This makes collaboration easier, because both people have a copy, and both people can work on it.
The code you turn in today will be the code that you and your partner have both contributed to on GitLab – your Gitlab repo is what you’ll turn in.
Git Pull
Swap roles again, so that the original driver is now driving again using their own computer.
If you look at the files on your computer, then you’ll notice that the newest change – the one that adds the navigator’s name to README.md – isn’t there. What is happening is that there are changes in the main GitLab repository, but they haven’t been copied down to your computer yet.
To do that, we can use the command git pull. This command will take all of the changes that are in the main repository on GitLab and pull them down to your computer. Run that now:
git pull
Now open the README.md file in the text editor on your computer, and you should see the changes, including both people’s names.
You want to run this command any time that your partner makes any changes and then commits and pushes those changes to the repository. Always remember to use git pull before you start working to make sure you have all the latest changes.
Part 2 - Programming
Now that you’ve got the Git repository and have figured out how to contribute to it, we can start working on modifying the programs in that repository.
We are going to begin with the program bottles.py, which is a simple program that prints out lyrics to a song – a modified version of the song 99 bottles of beer.
The first thing to do is to run the program on the command line:
python bottles.py
You should see it print out two verses of the song.
Exercise 1: Change the beverage
Right now, the song is being sung about water. The original song was about beer. What is your favorite beverage? Pick a new beverage, and change the song so that it is being sung about your favorite beverage.
Exercise 2: Last verse
The last verse gets down to zero bottles. No one likes singing about “zero” bottles. Most of the time, that last verse gets modified. For example, the Wikipedia article lists “No more bottles of beer on the wall, no more bottles of beer.” as the last verse.
Create a last verse that is more interesting for the song; one that doesn’t use the word or number “zero”.
Exercise 3: Save your changes using Git
OK, now you’ve made some changes to your bottles program. The next thing you should do it commit that code to your git repository. Use the same sets that you used above – git add <filename>, git commit -m "<message>", and git push – to commit those changes and push them back to the main repository on Gitlab.
Exercise 4: Swap driver and navigator
Now, swap driver and navigator. On the new driver’s computer, you should then git pull. Run the program again with python bottles.py and make sure that the your computer has all of the changes that your partner made for the previous exercises.
Exercise 5: 5 bottles
The song right now starts with only 2 bottles. That’s not very many. Expand the song to start with 5 bottles of your favorite beverage, and then count down until there are none left.
Exercise 6: Git Commit
OK, now you’ve made some more changes to your bottles program. You should commit that code to your Git repository. Use the same commands that you used above – git add <filename>, git commit -m "<message>", and git push – to commit those changes and push them back to the main repository on Gitlab.
Then, swap again, and have the other person git pull on their computer. Make sure all of the new code you both added to bottles.py are on both of your computers AND in your GitLab repository.
Challenges
If you have gotten through all of the exercises and tried out Git on both of your computers, great work! If you still have extra time before class ends, do at least one of the challenges below.
Challenge 1: Count
The GitLab repository for today has another Python program in it called count.py. Run the program. What does it do?
What happens if the user enters something other than Up or Down? Probably nothing good. Edit the program so it can account for case and for other options for user input, like ‘u’ for Up or ‘d’ for Down. Also add an error case for if the user types something other than the accepted inputs. (Hint: use else!)
Remember to add, commit, and push your changes to Git when you’re done.
Challenge 2: Bottles or something else?
In bottles.py, beverage is a variable that is replaced with something else. What else can you replace in the song to make it different? What if your beverage of choice comes in cans? What if the drinks are in the refrigerator instead of on the wall? Pick a word to replace and use a variable to replace it throughout the song.
Turning in your work
Take screenshots of your code working in command line, as per usual, and upload them to D2L under Assignments. If you got all of your changes up in your GitLab repository, you’ve already turned in your code for today! This is how you’ll turn your code in every class from now own. Make sure Caitlin and Shiyu are both added as members to your repository (see Give other people access to the new project)
Troubleshooting
Alternate Git installation methods for MacOS
Installing Homebrew manually: If the package installer doesn’t work, you can also install Homebrew manually. To do so, copy and paste this command into Terminal and hit Enter:
/bin/bash -c "$(curl -fsSL https://raw.githubusercontent.com/Homebrew/install/HEAD/install.sh)"
It will prompt you for your computer’s password before the install starts. If it gives you any errors, you may have to install the Xcode command line tools first. You can do so by running this command in Terminal:
xcode-select --install
Once Homebrew is installed, make sure to run brew install git to finish installing Git.
If you’re still getting errors after doing all these steps, you may have to do what’s called added Homebrew to PATH - that is, pointing your computer to where Homebrew is installed so you can use its functions. Do that by running this command in Terminal:
echo 'PATH="/usr/local/bin:$PATH"' >> ~/.bash_profile
Then try running brew install git again.
Alternate option for Mac: If you absolutely can’t get any of the above options to work, you can also install Git using the binary installer option on the Git for Mac downloads page. This will give you a much older version of Git (from 2021), but it will work for most things we do in this class.
Troubleshooting git clone
Sometimes, you get an error message when you try to download the repository using git clone.
NetID
When you run git clone the first time, it asks you for your username and password. The most common problem is that students put [email protected] in the box. Do NOT do that. Just put your username in the box – do NOT put the @msu.edu part.
If you did that, then try running git clone again, and use the correct username. If it doesn’t ask you for your username, then Git is trying to remember your (incorrect) username.
Windows remembering your password
When you first run git clone, git will ask you for your username and password. both MacOS and Windows will remember these – it won’t ask you for them again after the first time. However, sometimes you get something wrong the first time. Generally Mac handles this well – if it didn’t work, then Mac will prompt you again next time.
However, Windows sometimes remembers this wrong username/password, and then Git commands don’t work. To fix this, go down to the start bar and search for “Windows Credential Manager”. On the page that comes up, look through the list for the Git/GitLab credential. I usually just delete the entry for Git/GitLab. Then try running git clone again, and it should prompt you for your username and password.
Troubleshooting git commit
This section contains extra instructions for troubleshooting problems with git commit. Specifically, do this if no file opens when you git commit and you immediately get an error message.
If you type in git commit without the -m "message" at the end, Git will either give you an error or will try to open a text editor for you to type the message in. This isn’t a big deal on Windows. If it opens up a text editor window, close the window. Go back to command line and try again, making sure to add the message this time.
On Mac, it might open up a new screen inside Terminal. Terminal has a very old text editor called Vim built into it which is hard to use. To get out of it, type:
:wq
and then hit Enter. You can also close the Terminal window and reopen it.
Git conflicts
If multiple people are making changes to a repository at the same time, sometimes there can be conflicts. This especially happens in studios, where different people might be working on different aspects of the studio at the same time. A few tips for avoiding conflicts:
- Always use
git pullbefore you start working on a file to make sure you have the most updated version. - When you’re done working on a file, always add, commit, and push your code to Gitlab.
Don’t worry if you run into a conflict; Caitlin and Shiyu are always around to help you resolve them!
Git reference
I’ve put together a quick reference for Git on this site: Using Git